If your home smells fine one day but suddenly has a strong urine odor the next, the problem is usually not “new.” Most of the time, the odor source is hidden and it becomes noticeable when humidity rises, the heater turns on, or the area gets lightly re-wet from mopping or steam cleaning. The tricky part is that your nose is not always reliable, especially if you have lived with the smell for a while. You can also end up treating the wrong spot, which wastes time and makes the odor feel impossible to remove.
This guide will help you locate hidden pet urine odor the right way. You will learn a step-by-step process that homeowners can follow using simple tools, plus the signs that suggest you need a professional odor inspection.
Why pet urine odor is so hard to locate
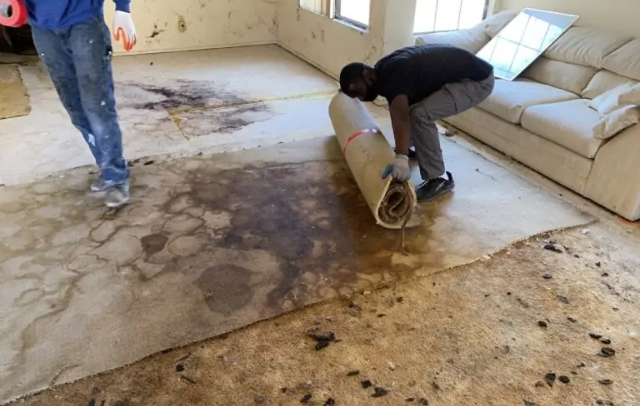
Pet urine rarely stays exactly where you see the stain. On carpet, it can pass through the fibers into the padding, then reach the subfloor. On hard floors, it can slip into seams and gaps. Near walls, it can wick into baseboards and the bottom edge of drywall. If a pet has been returning to the same area for weeks or months, the contaminated zone can spread beyond the original spot.
That is why many people clean the visible stain, spray deodorizer, and still smell urine later. If you want the odor to stop coming back, the first goal is not “clean more.” The first goal is “find the true source area and depth.”
If you already read our guide on recurring cat urine odor, it explains why the smell keeps coming back even after cleaning. Use that as your foundation, then come back to this step-by-step detection process to locate the hidden source.
What you need before you start
You do not need expensive equipment, but you do need consistency. The best results come from combining a few simple methods rather than relying on only one.
A UV flashlight can help, but it is not magic. UV can show old stains, detergent residue, and spills that are not urine. Your job is to verify suspicious areas with additional clues, like odor intensity, surface texture, and moisture patterns.
Before you begin, plan your inspection so you do not miss rooms or re-check the same area repeatedly.
Step 1 Create the right conditions for detection
Hidden odor is easiest to find when the scent is concentrated.
Close windows and run normal HVAC for about 30 to 60 minutes. If it is safe and comfortable, slightly warm air often makes urine odor more noticeable. Do not use strong air fresheners before inspection. They mask odor and make it harder to track.
If the odor only appears during humidity, you can test on a day when humidity is naturally higher. Another safe method is to lightly mist the general area with plain water using a spray bottle. Do not soak the floor. The goal is to gently rehydrate any dried residue so it releases odor. After 10 to 15 minutes, sniff again at floor level.
Step 2 Start with the nose test but do it correctly
Most people sniff from standing height. That is too high. Urine odor sits low and rises slowly.
Get closer to the floor. Move slowly around the room edges, corners, and along furniture lines. Cats especially tend to urinate near walls, corners, and protected spots. Dogs often hit open areas near pathways or door zones.
When you notice a stronger odor, pause. Mark that area mentally. Do not commit to it yet. You are building a “suspect map” before confirming with tools.
Step 3 Use a UV light the right way
UV inspection works best in low light.
Turn off the lights, close blinds, and scan slowly. Hold the UV light at an angle rather than straight down. Angled light can reveal texture changes and staining patterns.
When you see a glowing patch, do not assume it is urine. Treat it as a lead. Urine can glow, but so can many other substances. Your next steps will confirm whether the spot is truly the source of odor.
If you are scanning carpet, pay attention to the shape. Urine that traveled into padding often shows uneven borders. Small surface drips often look more concentrated and circular.
Step 4 Confirm with the blot test on carpet
Once you have a suspect area on carpet, do a simple blot confirmation.
Take a clean white cloth, dampen it slightly with water, and press it firmly onto the suspect area for about 20 to 30 seconds. Lift and smell the cloth. If the smell transfers, you likely found a real contamination zone.
If you can see discoloration transferring to the cloth, that is another clue. Even if you do not see much, smell is more important.
If the smell is strong on the cloth but the surface looks clean, that suggests the source is deeper, usually padding or subfloor.
Step 5 Check carpet padding without ripping everything up
If you can access a carpet edge inside a closet or along a wall seam, you can sometimes lift a small corner carefully. You are not doing a full removal. You are checking for odor and staining underneath.
Smell the padding and the subfloor beneath. If the odor is significantly stronger under the carpet than above it, the problem is below the surface. This is a big reason why surface cleaning fails.
If you cannot lift carpet safely, use the pattern method. If the urine odor is strongest in one zone but UV shows scattered marks, focus on the zone with the strongest odor intensity. That is usually the true source.
Step 6 Identify subfloor involvement
Subfloor contamination is common when urine has happened repeatedly or soaked through padding.
Here are the strongest signs.
The odor returns after deep cleaning
The odor is strongest near the floor even when the carpet looks clean
You replaced carpet but still smell urine
The smell spikes on humid days or when the heat turns on
If these match your situation, professional help is often the fastest path because it requires targeted treatment and sometimes sealing. This is where a dedicated odor inspection and detection service becomes valuable, because it helps you avoid guessing and missing hidden spots.
Step 7 Check hard floors seams and edges
On tile, laminate, and engineered wood, urine can travel into seams. The surface can look spotless while odor remains below.
Focus on edges near baseboards, around furniture legs, and near pet feeding areas. If you can, place your nose close to seams. If odor is stronger along a seam line, the urine may have seeped underneath.
A simple check is to lightly mist a small section of seam with water and wait 10 minutes. If odor becomes noticeably stronger, that suggests residue below.
Do not flood the area. Excess water can spread contamination or cause swelling in some floors.
Step 8 Inspect baseboards and drywall edges
If accidents happened near walls, check the bottom edge of drywall and the backside of baseboards.
Odor near the wall that does not match a carpet stain can indicate urine that wicked upward. The smell can persist even after flooring is treated. If the pet has repeatedly urinated in the same corner, this becomes more likely.
If you suspect wall involvement, you may need targeted repair. That is why drywall odor removal and repair exists as a separate service in many odor restoration cases.
Step 9 Check furniture and soft items properly
Couches, mattresses, pet beds, rugs, and cushions can hide urine in foam layers.
Do not only smell the cover. Press down with your hand and sniff near seams. Foam can hold odor deeply. If you have removable covers, check the foam core directly.
If you find a strong smell in a couch cushion, the odor source might not be the floor at all. Many homeowners chase the floor odor while the real source is a pet bed or a chair.
Step 10 Find the pattern, not just a single spot
Sometimes you find one obvious area, treat it, and still smell urine. That often means there is a second location.
Pets frequently create patterns.
Cats may urinate in multiple corners or return to the same protected area. Dogs may hit a hallway path or a spot near the door.
Once you find one confirmed source, scan adjacent zones in a radius around it. On carpet, think wider than the stain you can see. Urine can spread in padding.
Step 11 Decide the best fix based on what you discovered
Once you know the depth, you can choose the right approach.
If it is surface only, a correctly used enzyme cleaner and complete drying can solve it.
If it is in carpet and padding, you may need deeper treatment or removal of saturated padding.
If it is in the subfloor, sealing or repair is often required to stop odor from reappearing.
If it reached walls, localized repair may be necessary.
If you are unsure, or if you want certainty before spending money on cleaning or replacement, an odor inspection gives you a clear map of the contamination.
When you should stop DIY and call a professional
You should consider professional help if the situation includes any of these.
You smell urine even after multiple cleanings
The odor returns during humidity or after mopping
Your pet keeps returning to the same area
You suspect padding or subfloor involvement
You are preparing for move-out, selling, or renting and need guaranteed results
In these cases, the best next step is often professional odor inspection and detection first, followed by targeted cat urine odor removal or dog urine odor removal depending on the source.
FAQs
Can UV light miss pet urine?
Yes. Old stains, certain surfaces, and cleaning residues can hide or distort what UV shows. UV is a clue tool, not a final confirmation.
Why does the urine smell stronger when it rains or gets humid?
Humidity can rehydrate dried residues and push odor molecules back into the air. That is why odor can feel “gone” then suddenly return.
Can pet urine go through carpet into the floor?
Yes. It can move from carpet into padding and then into subfloor depending on volume, time, and repetition.
How do I confirm if the smell is from padding?
If odor is stronger when you press into the carpet, or if it is stronger near the floor even when the surface looks clean, padding is a likely source. If you can access a small edge to check underneath safely, odor intensity under the carpet is a strong confirmation.
What is the fastest way to find hidden odor in a large home?
Use a consistent process: create detection conditions, do a floor-level nose pass, then confirm suspects with UV and blot tests. Mark rooms and move systematically so you do not miss areas.