If you are dealing with pet urine odor in your home, you want two things. You want it gone permanently, and you want to know how long your life will be disrupted. That is a fair question because professional odor removal is not the same as a quick surface cleaning. The timeline depends on where the urine went, how deep it soaked, and which solution is required to stop the odor from coming back.
This guide explains what a real professional pet odor removal timeline looks like, what happens at each step, and the factors that can make the job faster or longer. You will also learn how to plan around pets, furniture, and drying or curing time so you are not surprised.
Why timelines vary so much for pet odor jobs
Pet odor is not one problem. It can be surface level, trapped in carpet padding, absorbed into the subfloor, or even wicked into baseboards and drywall edges. Each layer adds time because it requires different methods.
why cat urine smell keeps coming back even after cleaning.
The shortest timeline happens when the problem is surface level
If the urine is truly surface level and there is no padding or subfloor involvement, professional treatment can sometimes be completed within a single visit, followed by drying time. The key is that the odor must not return with humidity or light re-wetting.
A surface level timeline is usually straightforward.
Step 1 Identify the source zone
Step 2 Apply targeted treatment and extraction if needed
Step 3 Dry the area properly
Step 4 Quick verification and homeowner guidance
If you are not sure whether it is surface level, do not guess. Use the detection process from Blog 2 or start with a professional odor inspection so you do not waste time treating the wrong layer.
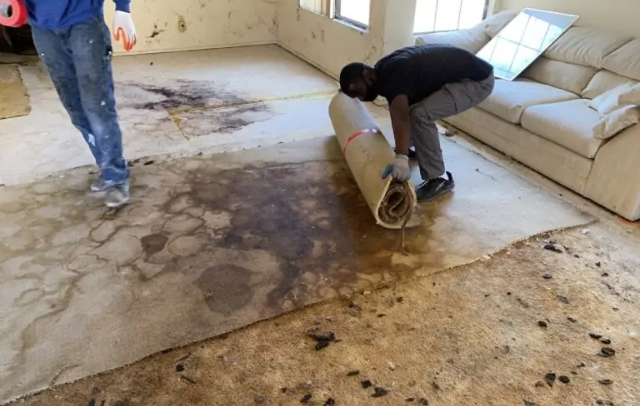
The most common reason jobs take longer is hidden odor below the carpet
Once urine reaches carpet padding or the subfloor, the job is no longer just cleaning. It becomes a restoration type process. That does not always mean demolition, but it often means additional steps like lifting carpet, treating below the surface, sealing, curing, and verifying.
This is why many homeowners feel like they have been fighting the smell for weeks with DIY. Professional work compresses that time, but it still needs the correct sequence.
A realistic step by step professional timeline
Most professional odor jobs follow the same structure, even if the details change.
Step 1 Odor inspection and mapping
This is where the team confirms where the odor is coming from and how deep it is. This step prevents the most expensive mistake, which is treating carpet when the subfloor is the real source, or replacing padding when wall edges are still contaminated.
If you have multiple rooms or you do not know the source, inspection is usually the best first step. It is also the step that makes the timeline more predictable.
Step 2 Preparation and access
Preparation is often what homeowners underestimate. A team can work much faster when the affected zone is accessible.
Preparation can include moving light furniture, pulling back a carpet edge, protecting unaffected areas, and planning airflow for drying.
If the odor is in a tight corner behind heavy furniture, the timeline can increase. This is not because the treatment is slow, but because access is slow.
Step 3 Targeted treatment based on the affected layer
This is where the job splits into different timeline paths.
If the odor is in carpet fibers only, treatment can be quicker.
If the odor is in carpet padding, it often requires subsurface methods or padding replacement.
If the odor is in the subfloor, sealing or repair may be required.
If the odor is in drywall edges, localized repair may be needed.
Blog 3 explains why enzyme cleaners can fail when the source is below the surface. Professional methods work best because they are designed to reach the correct layer and control moisture.
Step 4 Drying or curing time
Drying and curing is where many timelines are won or lost.
A job can be completed physically in a day, but the home may need time to dry or the sealer may need time to cure before carpet and padding can go back down.
Drying and curing time depends on humidity, airflow, and what materials were treated. This is also why the odor can seem gone immediately but return later if the job was not verified after the environment returns to normal.
Step 5 Verification and follow through
Verification is what separates a quick deodorizing job from a permanent solution.
Verification can include re-checking after drying, checking the hotspot zones again, and making sure the odor does not return with normal HVAC conditions.
If you want a permanent result, verification should be part of the timeline, not an afterthought.
Typical timeline scenarios and what they look like
Instead of giving you a single number, here are realistic scenario categories.
Scenario A Single recent accident with surface level odor
Many surface level jobs can be completed within one visit, plus drying time that can run through the rest of the day depending on the method used. This is the fastest category.
This is also the category where DIY sometimes works, if done correctly, but professional service can be faster and more reliable.
Scenario B Odor in carpet padding
When padding is involved, the timeline often includes access to the padding layer and either deep subsurface treatment or partial replacement.
If padding replacement is required, there is typically an added step for removal and reinstallation. The timeline also depends on whether the team needs to wait for a subfloor treatment or sealing step before reinstalling padding.
pet urine odor in carpet padding.
Scenario C Odor absorbed into the subfloor
When subfloor is involved, timelines increase because the permanent fix often includes subfloor odor sealing, cure time, and verification.
In mild cases, deep treatment and full drying may solve it. In moderate cases, sealing is typically the permanent solution. In severe cases, repair or partial replacement may be needed, which adds more time.
Scenario D Odor in wall edges or drywall
If the hotspot is at a wall corner and urine wicked into baseboards or drywall edges, the timeline includes localized repair steps. That is a different workflow than carpet treatment, and it can require additional drying or curing time.
Scenario E Multiple rooms or repeated accidents over months
This is the most variable category. It often requires inspection first, then prioritizing hotspots. The timeline may be staged, meaning a team addresses the worst zones first, verifies, and then moves to additional areas.
This is also the category where a professional plan saves the most time overall. Without a plan, homeowners often spend weeks chasing odor across rooms.
What affects the timeline the most
Factor 1 How many hotspots exist
One hotspot is faster than three hotspots in three rooms. Many homes have more than one spot, especially when a pet has been marking.
Use Blog 2 to find hidden odor zones or start with inspection to map everything in one go.
Factor 2 Material type and flooring layout
Carpet with thick padding behaves differently than laminate or tile. Wood subfloors absorb differently than concrete. Edge gaps and seams can hide residue.
The more complex the flooring system, the more careful the process needs to be, and that affects time.
Factor 3 Humidity and airflow in the home
Humidity can slow drying and can also increase odor sensitivity during verification. Proper airflow planning can speed drying, but you still need enough time for materials to return to normal.
Factor 4 Access and furniture
If the source is under a bed, in a tight closet, or behind built-in furniture, access can be the longest part of the day.
You can shorten the timeline by clearing the area before the team arrives if that is possible.
Factor 5 Pets and safety constraints
If you have pets that must stay separated from treated areas, the team may need to stage work. Sealing or repairs can also require pets to be kept away until surfaces are fully cured.
How to plan your day around professional odor removal
Homeowners usually want clear expectations. Here is what to plan for.
Plan for access. Clear the suspect zone.
Plan for noise. Fans and equipment may run.
Plan for drying time. Avoid walking on treated areas until instructed.
Plan for pets. Keep pets away from treated zones.
Plan for verification. Do not rush to cover things back up if the team recommends a check.
If the job includes subfloor sealing, the most important planning tip is to respect cure time. Cure time is what locks in the permanent result.
What you can do before the appointment to shorten the timeline
You can often reduce time and cost by being prepared.
- Identify where odor is strongest and tell the team
- Share whether it is cat, dog, or unknown
- Share whether odor returns with humidity
- Mention if carpet or padding has been replaced before
- Move small furniture away from suspect zones
- Avoid masking with strong fragrances before inspection
If you want a quick self-check, Blog 1 and Blog 2 together can help you describe the problem clearly, which speeds diagnosis.
How to know if you need inspection first or direct treatment
Inspection first is best when any of these are true.
The odor keeps returning after cleaning
You do not know the exact hotspot
You suspect padding or subfloor involvement
The smell is strongest in corners or wall edges
You are dealing with multiple rooms
You need guaranteed results for move out or listing
Direct treatment can be reasonable when the hotspot is obvious and surface level.
Cat urine timelines versus dog urine timelines
The timeline difference is usually about pattern, not pet type.
Cat urine cases often involve repeat hotspots near wall edges, which can increase the chance of subfloor or drywall involvement. That can extend the process.
Dog urine cases often involve larger volume that can spread wider, which can increase the size of the area treated.
If you want the most accurate path, choose the correct service.
Cat Urine Odor Removal
dog urine vs cat urine odor.
FAQs
Can professional pet odor removal be done in one day
Sometimes, especially for surface level or limited areas. But if padding, subfloor sealing, or repairs are involved, drying and cure time can extend the practical timeline.
Why do I still smell odor during drying
Moisture can temporarily reactivate residues while the area is being treated or drying. The real test is after full drying and verification.
How long should I wait before putting furniture back
Follow professional guidance. The safest approach is to wait until the area is fully dry or fully cured if sealing was used.
Does subfloor sealing add time
Yes. Sealing includes prep and cure time. It is often the most reliable permanent solution when urine has absorbed into the structure.
How do I make the job faster
Clear access, avoid masking odors before inspection, and start with accurate detection. Inspection often reduces total time by preventing wrong treatments.